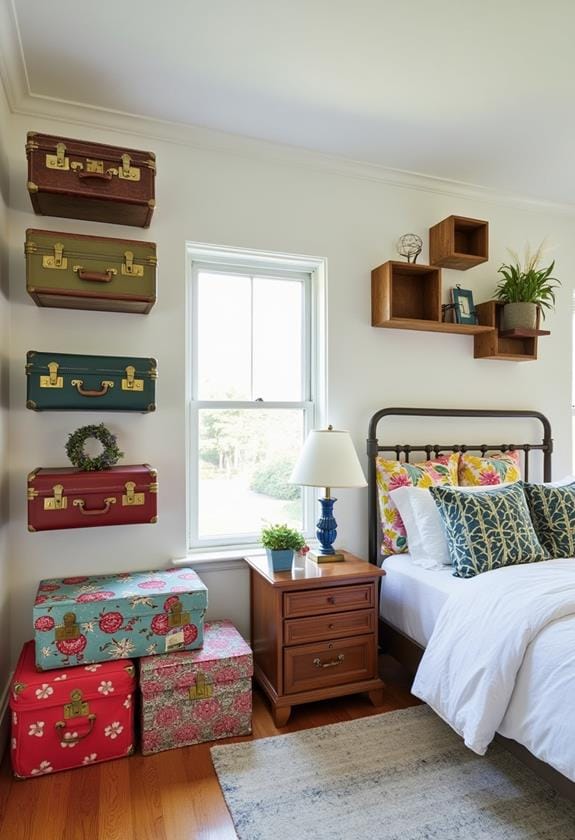
You'd be amazed at the everyday items that can transform into stunning DIY headboards! Got old pallets lying around? Sand 'em down and paint 'em up for a rustic charm. Feeling crafty? Grab some foam boards and your favorite fabric for a plush, custom look. Old doors and window shutters add vintage flair, while woven rope brings a beachy vibe. Want something luxe? Try faux leather tufting on a budget. Mosaic tiles, oversized canvas art, or wallpaper-framed plywood can all make a statement. With a little creativity, you'll turn your bedroom into a personal sanctuary without breaking the bank. Ready to explore more unique ideas?
Design Highlights
- Repurposed wood pallets offer a rustic charm and can be easily customized with paint or stains.
- Fabric-covered foam boards provide versatility and allow for easy style changes.
- Woven rope designs create unique textures and can be made with inexpensive materials.
- Cardboard can be used for temporary or experimental headboards on a tight budget.
- Wallpaper applied to plywood or MDF offers endless design possibilities at a low cost.
Repurposed Wood Pallets
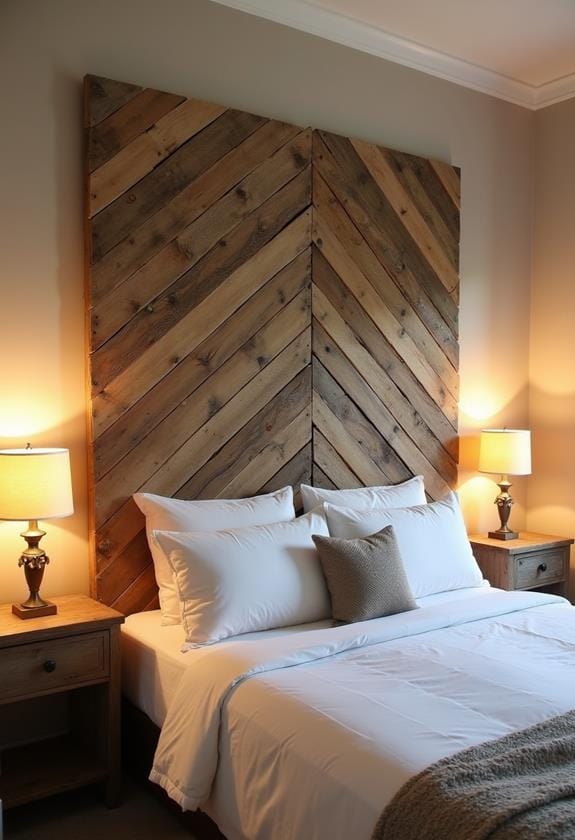
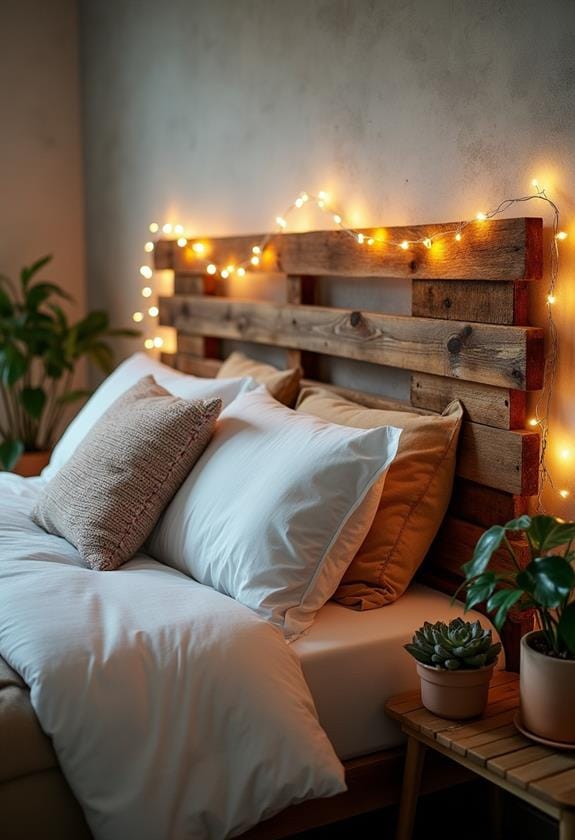
In spite of their humble origins, wood pallets can be transformed into stunning headboards. You'd be amazed at how these discarded shipping materials can become the focal point of your bedroom. Similar to floating shelves, pallets can be easily repurposed for a chic, rustic look. Ready to give it a try? Start by sanding down those rough edges – no one wants splinters in bed! Then, it's time to get creative. You could stain the wood for a rustic look or paint it in your favorite hue. Feeling adventurous? Why not add some string lights for a cozy glow? The best part? It's totally customizable. Make it as wide or tall as you like. And don't forget, each pallet has its own unique character. Those knots and imperfections? They're what make your headboard one-of-a-kind. So grab your tools and let's turn trash into treasure!
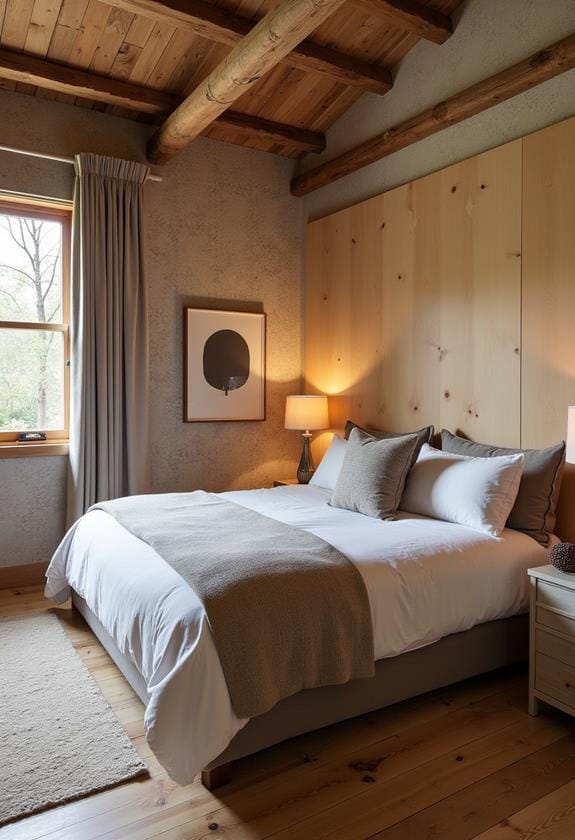
Fabric-Covered Foam Boards
Countless DIY enthusiasts have discovered the versatility of fabric-covered foam boards for creating custom headboards. You'll love how easy and affordable this project can be! Start with a large foam board from your local craft store. Then, pick out a fabric that speaks to you. Florals, geometrics, or solids—the choice is yours! Wrap that fabric around the foam like you're gift-wrapping a present, and voila! You've got yourself a chic headboard.
But here's where it gets fun. Why stop at one board? Stack 'em up for a tufted look. Or arrange them in a funky pattern. Remember those 80s geometric shapes? Yeah, you can do that too! And the best part? If you get bored, just swap out the fabric. It's like getting a new headboard without the hassle. Genius, right?
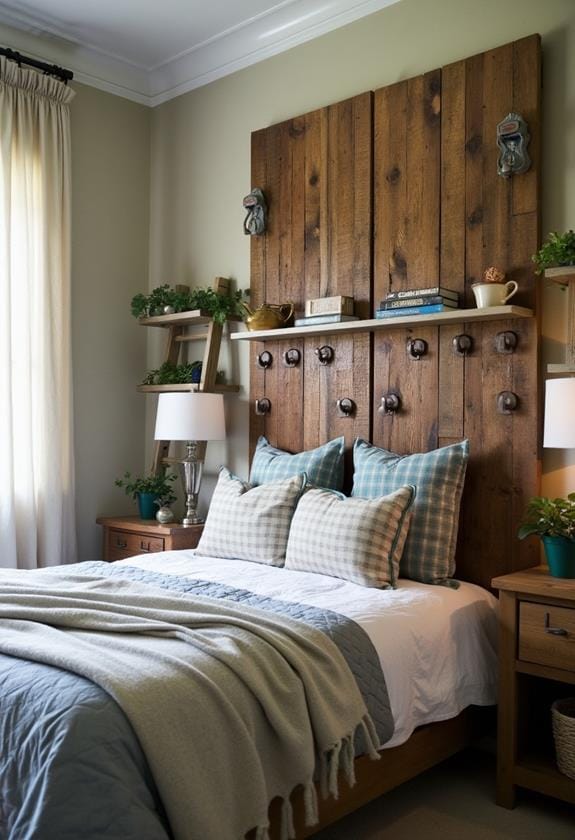
Painted Vintage Doors
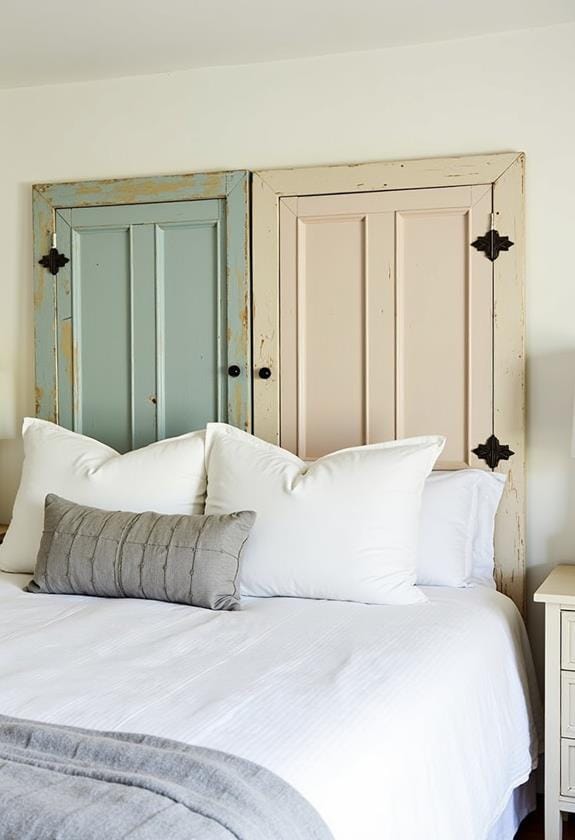
Ready to take your headboard game to the next level? Seek no further than painted vintage doors! These charming relics can breathe new life into your bedroom, adding character and a touch of nostalgia. You'll love how easy they are to find – flea markets, antique shops, and even your grandma's attic are treasure troves for old doors. Affordable DIY headboards like these are perfect for elevating your bedroom style without breaking the bank.
Once you've scored your perfect door, it's time to get creative. Sand it down, prime it, and pick a color that speaks to you. Feeling bold? Go for a vibrant teal or sunny yellow. Want something more subtle? Stick with a classic white or soft gray. Don't forget to seal it for protection.
Mounting is a breeze – just secure it to your bed frame or wall. Voila! You've got a one-of-a-kind headboard that'll make your friends green with envy.
Woven Rope Design
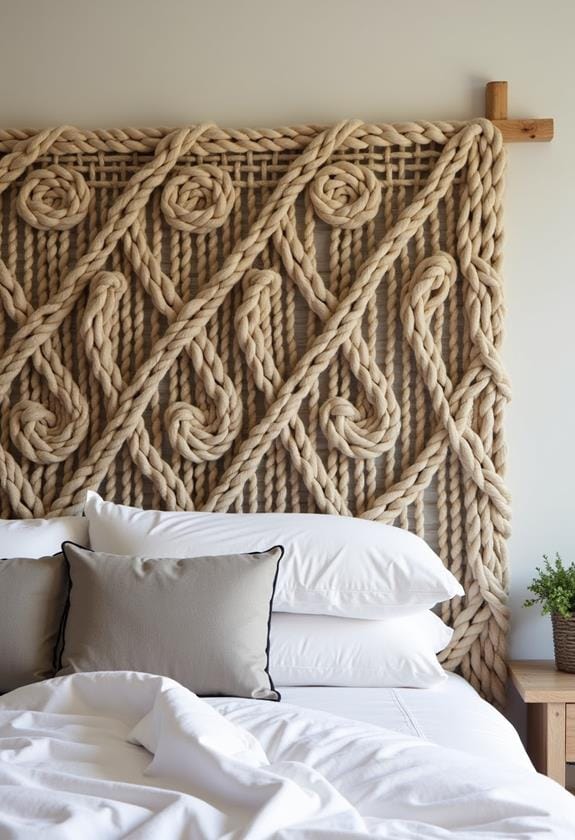
A woven rope design offers a nautical twist on DIY headboards. It's surprisingly easy to create and adds texture to your bedroom. You'll need a wooden frame, some thick rope, and a bit of patience. Start by mapping out your pattern – think macramé on a larger scale. Knot the rope at regular intervals along the frame, then weave it back and forth. Tight weaves create a denser look, while looser ones let the wall peek through. This nautical theme can complement your fall entryway decor, creating a cohesive look throughout your home.
Ever tried your hand at knot-tying? Well, now's your chance! This project's perfect for channeling your inner sailor. And the best part? You can customize the color and thickness of the rope to match your decor. Feeling adventurous? Mix in some beads or shells for extra coastal charm. Before you know it, you'll have a one-of-a-kind headboard that's sure to impress.
Faux Leather Tufted Panels
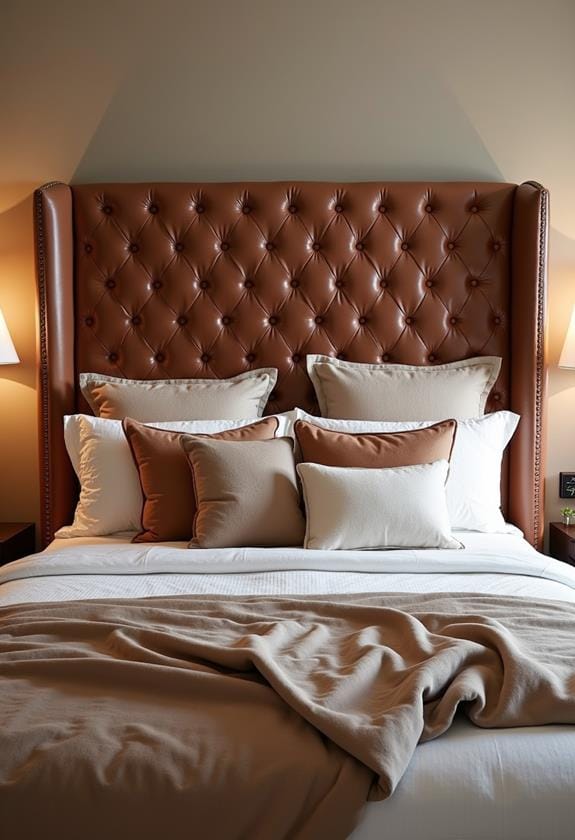
For a luxurious look without the hefty price tag, faux leather tufted panels make an excellent DIY headboard option. You'll love how they transform your bedroom into a high-end retreat. And guess what? They're surprisingly easy to make!
Here's what you'll need:
- Plywood board
- Foam padding
- Faux leather fabric
- Buttons and a staple gun
Start by cutting the plywood to size. Then, add foam padding for that cushy feel. Wrap it all in faux leather, pulling it taut. Now comes the fun part – creating those fancy tufts! Use buttons and thread to create deep dimples in the fabric. Voila! You've got a headboard that looks like it cost a fortune. Isn't it amazing what you can do with a little creativity and elbow grease?
Reclaimed Window Shutters
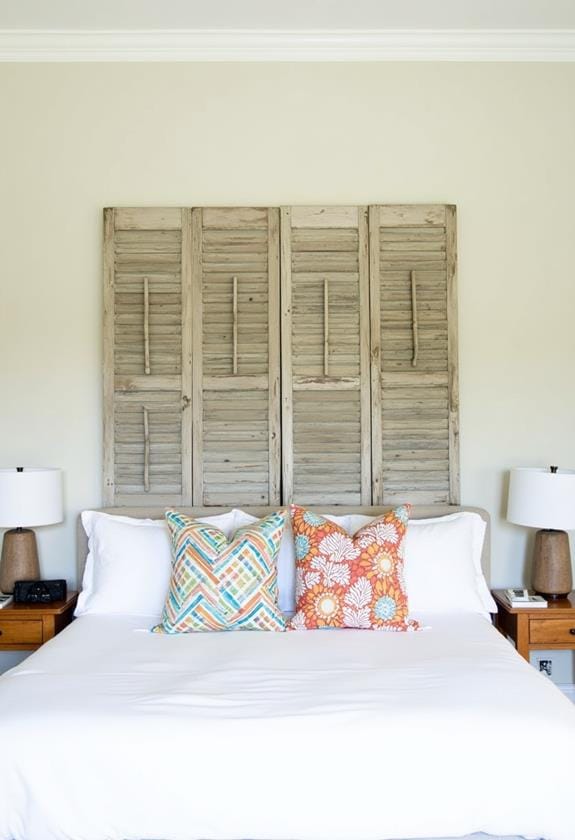
With a nod to rustic charm, reclaimed window shutters offer a unique and eco-friendly headboard option. You'll love how they instantly add character to your bedroom. First, scout flea markets or salvage yards for old shutters – the more weathered, the better! Clean them up, but don't go overboard; those chips and dings tell a story.
Arrange the shutters side by side, or stack them for a taller look. Want to get creative? Paint them in a shabby chic style or leave them au naturel. You can even hang small plants or photos from the slats. Worried about comfort? No problem! Just add a thin cushion behind the shutters where your pillows will rest. Voila! You've got a one-of-a-kind headboard that'll make your guests say, "Where'd you get that?"
Mosaic Tile Patterns
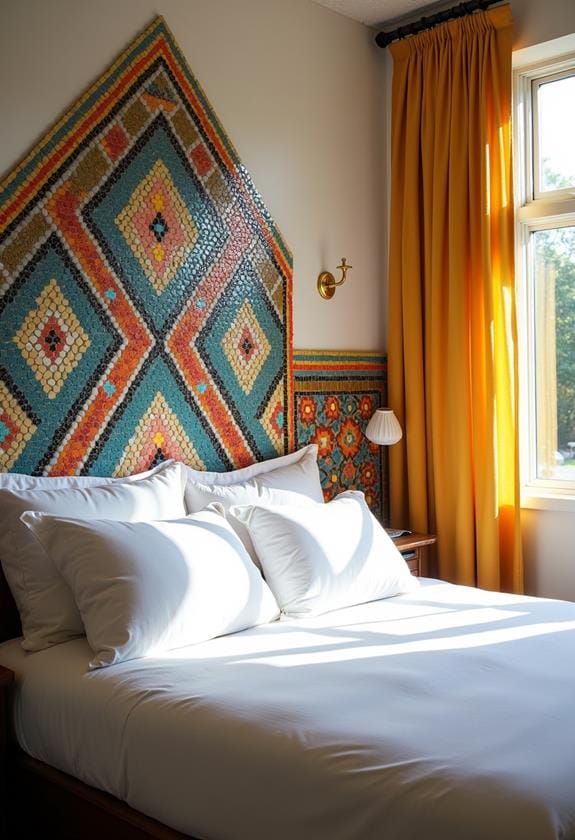
Countless DIY enthusiasts are turning to mosaic tile patterns for a stunning and personalized headboard. It's no wonder why – you can create a one-of-a-kind masterpiece that reflects your style and adds a pop of color to your bedroom. But where do you start? Let's plunge into it!
- Choose your tiles: Glass, ceramic, or even broken dishes work great.
- Pick a design: Go for geometric shapes or freeform patterns.
- Gather supplies: Adhesive, grout, and a sturdy backboard are must-haves.
- Get creative: Mix and match colors for a vibrant look.
Oversized Canvas Art
Imagine transforming your bedroom with a striking, oversized canvas art headboard. It's easier than you think! Start by choosing a canvas that spans the width of your bed—the bigger, the better. You can paint it yourself or find a ready-made piece that speaks to you. Remember, this is your personal statement. If you're looking for inspiration, consider fall-inspired themes that can add a cozy, seasonal touch to your bedroom decor.
Why not try an abstract splash of colors that complement your room's palette? Or go for a calming landscape that'll transport you to your happy place every night. Feeling bold? A black and white cityscape could add some urban chic to your sleep space.
Don't worry if you're not Picasso. Even simple geometric shapes or a motivational quote in a funky font can make a big impact. And the best part? You can swap it out whenever you fancy a change. Isn't that liberating?
Wallpaper-Framed Plywood
Looking for a more structured approach to your DIY headboard? Wallpaper-framed plywood might be just the ticket! It's a fantastic way to add personality to your bedroom without breaking the bank. You'll love how this project combines the warmth of wood with the pizzazz of your favorite wallpaper pattern.
Here's what you'll need:
- A sheet of plywood cut to size
- Your chosen wallpaper
- Thin wood strips for framing
- Wood stain or paint
Ready to get started? Start by applying the wallpaper to your plywood. Then, frame it with those thin wood strips. Stain or paint the frame to complement your decor. Voilà! You've got a one-of-a-kind headboard that'll make your friends green with envy. And the best part? You can switch up the wallpaper whenever you fancy a change!
Frequently Asked Questions
How Do I Properly Clean and Maintain My DIY Headboard?
You've put in the effort to create a stunning DIY headboard, so let's keep it looking fabulous! Regularly dust it with a soft cloth or vacuum attachment. For fabric headboards, spot-clean spills immediately and give it a gentle shampoo every few months. Wood or metal? A quick wipe-down with a damp cloth works wonders. And here's a pro tip: rotate your pillows to prevent wear in one spot. Feeling adventurous? Why not switch up your bedding to give your headboard a fresh look?
Can I Make a DIY Headboard That's Easily Removable or Portable?
You can whip up a portable headboard in no time. Try using a large canvas or pegboard – they're lightweight and easy to hang. Or, get creative with a folding room divider. Just prop it behind your bed, and voila! Need to move? No problem. These options are a breeze to take down and transport. And hey, why not experiment with fabric-covered foam boards? They're comfy, customizable, and you can switch them out on a whim. Who says headboards can't be flexible?
What Tools Are Essential for Creating a DIY Headboard?
Ready to tackle that DIY headboard? You'll need some basics: a drill, screwdriver, and measuring tape are musts. Don't forget a saw if you're cutting wood! A staple gun's handy for fabric projects, and sandpaper's great for smoothing edges. Oh, and grab some safety gear – goggles and gloves. Depending on your design, you might want a level or stud finder too. Remember, half the fun's in gathering your tools. It's like prepping for a home decor adventure!
Are There Any Fire Safety Concerns With DIY Headboard Materials?
You bet there are fire safety concerns with DIY headboards! Be smart about your materials. Avoid highly flammable stuff like untreated fabrics or dry grass. Stick to fire-resistant options like treated wood, metal, or stone. And hey, why not spritz on some fire-retardant spray for extra peace of mind? Remember, your bedroom should be a dreamy oasis, not a potential tinderbox. Safety first, style second – but who says you can't have both?
How Can I Incorporate Lighting Into My DIY Headboard Design?
Like a beacon in the night, your DIY headboard can shine bright! You've got options galore. Why not weave in some fairy lights for a dreamy glow? Or, go bold with LED strips along the edges. Battery-operated sconces are a snap to install and add a touch of elegance. For a fun twist, try incorporating old lamps or even mason jars with battery candles. Just remember to keep safety in mind – no exposed wires or heat sources near fabrics!